Node.js tutorial part 1: setting up your environment
In a previous post I explained what Node.js is and how it works. Now, I’ll help you install it and create your first Node.js powered webpage.
I make the assumption you have some basic HTML and Javascript knowledge.
Node.js is installed as part of the npm installation. npm is a very powerful Javascript package manager that will save you tons of work when used properly. We at Integration & Application Talents do not suffer from the “not invented here” syndrome!
Let’s get started quickly now. There are many ways to develop Node.js web applications, but I find myself comfortable with the combination of NetBeans and commandline npm.
After downloading and installing npm (there is plenty of documentation for that, for instance here), create a directory demonode, and use that as your working directory. Create a file named main.js containing the following code:
var http = require('http');

http.createServer(function (request, response) {

   response.writeHead(200, {'Content-Type': 'text/plain'});

   response.end('Hello Worldn');
}).listen(8080);

console.log('Server running at http://127.0.0.1:8080/');
When you execute the command node main.js, you will be able to access the page on localhost:8080.
Although it works like a charm, there is not much you can do with this page. At this point, you probably want to leave the command line behind and use a proper IDE.
But not before you entered this command in the working directory:
npm init
This results in a wizard which creates a package.json file.
MacBook-Air:demonode patricksinke$ npm init
This utility will walk you through creating a package.json file.
It only covers the most common items, and tries to guess sensible defaults.

See `npm help json` for definitive documentation on these fields
and exactly what they do.

Use `npm install <pkg> --save` afterwards to install a package and
save it as a dependency in the package.json file.

Press ^C at any time to quit.
name: (demonode)
version: (1.0.0)
description:
entry point: (main.js)
test command:
git repository:
keywords:
author: Patrick Sinke
license: (ISC)
About to write to /Users/patricksinke/dev/NetBeansProjects/demonode/package.json:

{
  "name": "demonode",
  "version": "1.0.0",
  "description": "",
  "main": "main.js",
  "scripts": {
    "test": "echo "Error: no test specified" && exit 1"
  },
  "author": "Patrick Sinke",
  "license": "ISC"
}


Is this ok? (yes)
MacBook-Air:demonode patricksinke$ ls
main.js		package.json
MacBook-Air:demonode patricksinke$
Now you can open the project in Netbeans, and Netbeans will make additional settings. Unfortunately, it doesn’t work out of the box.
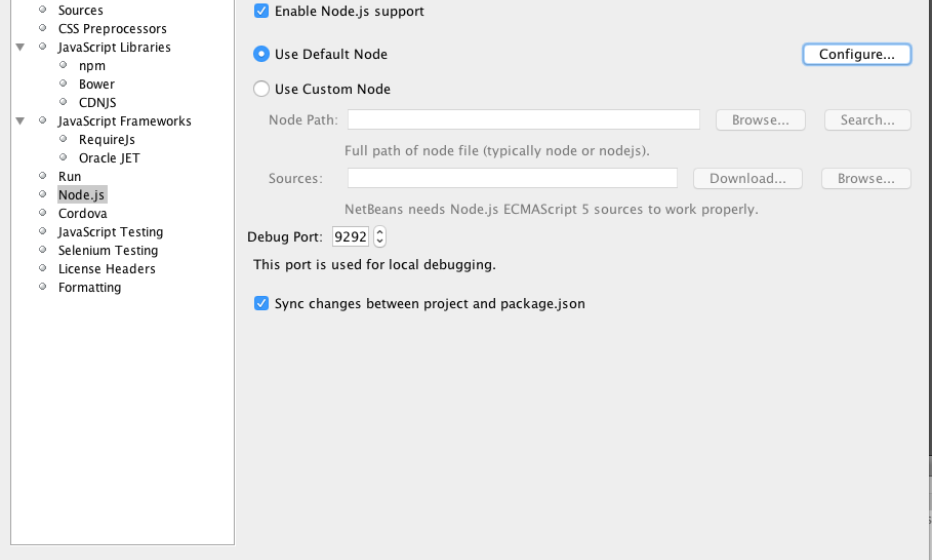
Right-click on the projectname, select properties and navigate to node.js on the left side. Check the box to enable node.js support, make sure the checkbox Sync changes between project and package.json is selected, and click Configure.
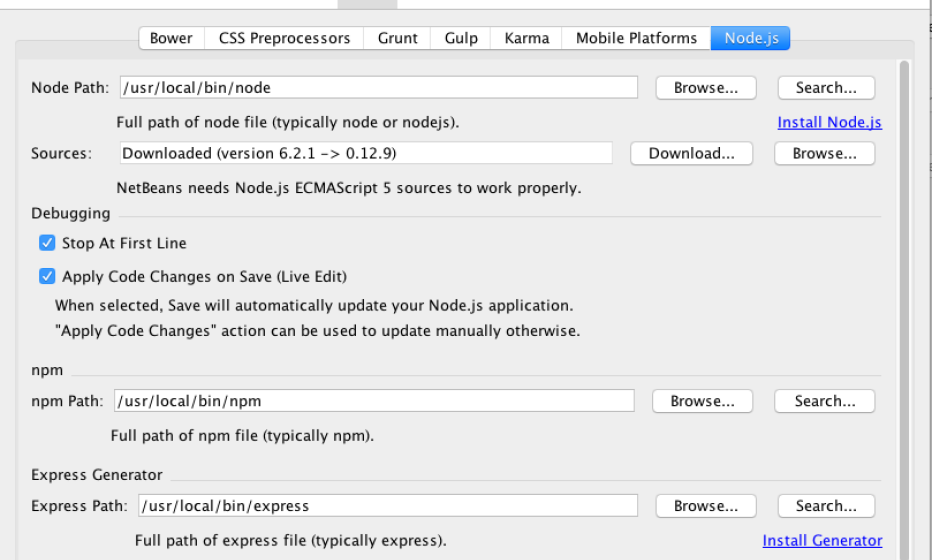
The paths to node, npm and optionally express must be provided here. Now is a good time to install express (link in the bottom, Install Generator). You are going to need it sooner or later.
We’re not quite done. Confirm the Node.js options, and in the previous screen click on Run.
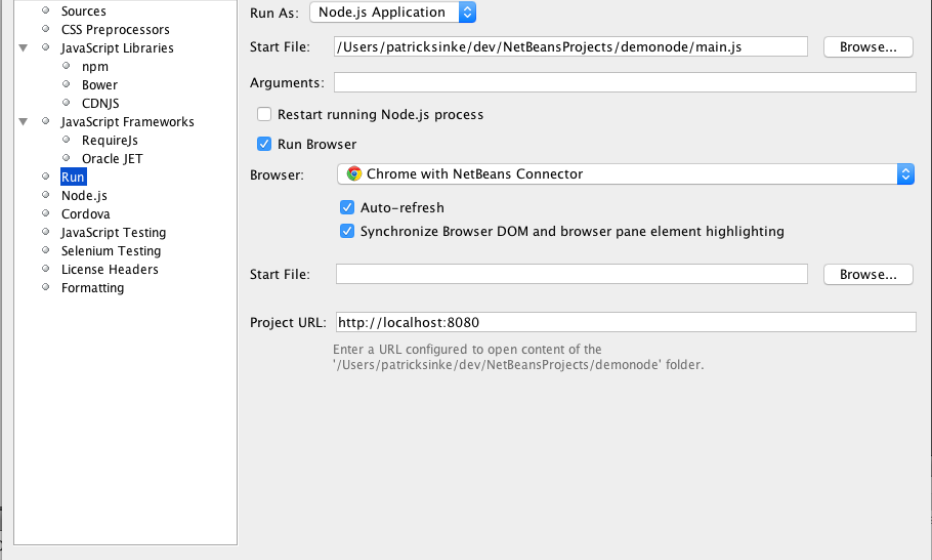
Here, you have to set the top poplist to “run as Node.js application” (if NetBeans hadn’t already asked you to do so). The upper startfile refers to your serverside Javascript, which is the Main.js created earlier. Also, provide the Project URL , which is http://localhost:8080 in our case (exactly as in the main.js). The “http://” part is required.
If all steps are carried out correctly, you probably received a message that the changes are synchronized to the package.json. That is desirable, because you want NetBeans to manage some of your settings, but the other way around too.
And of course, you now can start the service with the green arrow in NetBeans. When you do, the log will show:
"/bin/bash" "-lc" ""/usr/local/bin/node" "/Users/patricksinke/dev/NetBeansProjects/demonode/main.js""
Server running at http://127.0.0.1:8080/
And a browser will open displaying your Hello World page. Additional console.log messages and errors from the main.js will be displayed here too.
I hope configuring your node.js development environment has become a little bit easier now. Let me know if you have any problems setting it up.
